Why do I want a typewriter with all these features? Because I want to be able to generate artwork that a typewriter can then print out. Much in the same way that vector graphics can be 'printed' by a pen-plotter, I want to print out images based on digital images. You may be thinking I am describing a simple terminal printer to create printer ASCII art, but I want better resolution and control. Basically I want to create the hardware and software needed to take a photograph and spit out something like these:
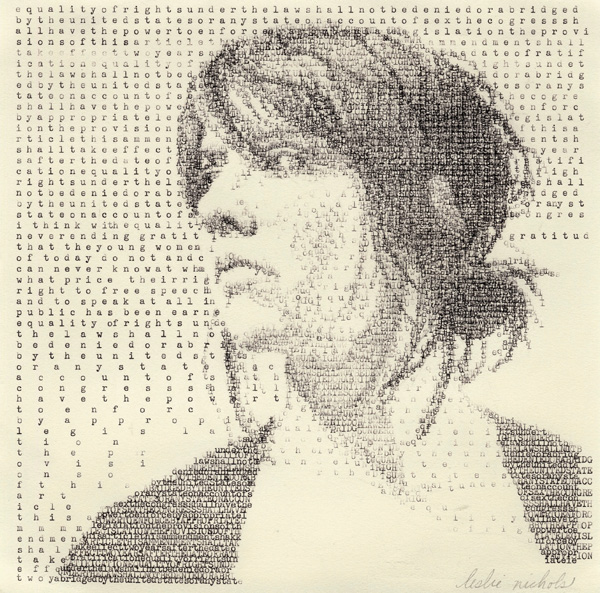 |
| 'Looking Forward' by Leslie Nichols (2010) Check out her website. |
 |
| by Keira Rathbone (2015) Check out her website |
With this in mind, I went looking for a typewriter I could start playing with. Manual typewriters were too much work to automate (would likely require either a large amount of powerful actuators or addition of a complex mechanical switching mechanism). I started looking at the IBM Memory, a electronic controlled version of a Selectric typewriter, but after ordering a broken one off eBay I found it was going to be too difficult and too destructive to the rare machine to add stepper motor control to get the fine control of the two axes I was looking for.
I found a fair compromise in the more modern daisy wheel printers that have stepper motors in the two axes already, and lucked out in finding one for $10 at a local Goodwill. It's a Smith Corona Spellright 100 from the early 1980s. I was excited to see a DB9 connector in the back and I was optimistic I could hack a simple interface to command the typing element, but I had no such luck as it turns out this port is an undocumented proprietary communication port. I tried sniffing around for some sort of serial connection inside the typewriter, looking up the data sheets for the DIP components, and connecting to open headers on the board, but was not able to establish communication. I did find that the keyboard was a somewhat simple switch matrix that I could simulate with about 8 output pins and some logic decoders, so that is the route I took.
I used a EiBotBoard as my control center for this project. With it I could have my PC spit out somewhat simple commands to do the output pin switching (faking keyboard inputs) and to control the two stepper motors. I made a protoboard with all the logic (consisting of two 3-to-8 decoders and a bunch of small transistors) for keyboard faking and had it plug-in to the same spot the keyboard ribbon connected. I wrote some Processing code to take my PC keyboard inputs and translate them to the needed outputs to fake the same keyboard press. I had successfully turned the typewriter in a terminal printer. I even wrote a little more code to have it print out a text file.
Emboldened by this success, I went about wrestling control of the stepper motors away from the typewriter, so I could add the fine control I wanted. This was not easy. I found quickly that the typewriter had unipolar motors, and these unipolar motors were none too happy about being run in any of the methods I found online when I googled "run unipolar motors with bipolar drivers". I eventually got them to run pretty happy with a four-diode-setup per motor, effectively allowing the bipolar driver to simulate a unipolar current in the motors. The motors were working with a fair bit of torque and fairly smoothly, but there were more troubling issues at hand, namely that the motors were not capable of micro-stepping and the resulting resolution was not as good as I had hoped (about 1.5mm). Also the left/right motor would occasionally skip a step or two, which was fine for typing, but when doing long open-loop control 'prints' it caused drifts that would create errors. I also ran into some other issues with power on the EiBotBoard. Even with an external 3A 9V power supply hooked up, I found that when I would run the motors, some of my output pin voltages and grounds would have noise on them, resulting in somewhat unpredictable faked-keyboard outputs.
Despite the issues with the motors and controls, I pressed on to try and get my typewriter to do something worthwhile. I found that the pins I needed to type a period were not effected by the noise issue, so I wrote an instruction to print out a stipple imaged of my dog, Milo, using nothing periods. I created this image with a simple dithering algorithm, and printed it out. It took a surprisingly long time to print (about 5 hours), but considering it has over 16,000 periods, that works out to about 1 character per second.
 |
| 'Milo' by zeke. |
I had some other issues with this typewriter not mentioned above. For one, there was some considerable dead-band on the two axes, so for every typed character I had to have the motors approach from the same direction, which complicates the code and takes time out to perform extra movement. Secondly, in order to advance the ribbon I had to move the carriage forward immediately after a character was typed, but the time between when a key press was 'faked' and when a character was typed on the page had some variables associated with it. A big part of this variable time was how long it took the daisy wheel to move to the desired letter. I came up with some code to estimate this time, but it wasn't pretty. Even with this correction in place, there was still some variation, which made it tough to advance the ribbon and not start moving the carriage before the letter was struck.
All these issues resulted in what is possibly the worlds worst, slowest dot matrix printer. A far cry from the typewriter I really want.
All in all, I enjoyed playing with this typewriter, but I don't think I am going to continue much further with this daisywheel in particular. The idiosyncrasies listed above, the fact that I can't use ink ribbons without considerable extra effort, the slow type speed resulting from navigating around dead band and ribbon advance, and the poor resolution make me want to look for some different hardware to bring my typewriter ideas to life. It was fun while it lasted, but I think the Spellright and me are going different places. Luckily, all my hacking was non-destructive and all my jack-ins were done at the ribbon-header connections, so I can put this typewriter back together and donate her back to a thrift shop to find another home. (Update: I was planning on taking some pictures of the boards and motor connections I had added to the typewriter, but I took the boards out and converted the typewriter back to 'stock' before I remembered to take pictures, and the typewriter is already back at Goodwill.)
I think my next avenue may be modifying a broken Olivetti Praxis 48, which should provide a great starting point for building my ideal typewriter (typebar mechanism, electric, possibly electronic?, ink ribbons). I will likely acquire and start modding in the fall, when I might have some more free time. I plan on documenting the next typewriter with much more detail and hope to get even better 'prints' that will make complicated type planning algorithms worthwhile.